Build your own diy aeroponic system
My first encounter with a commercially-available hydroponic system was a garden professionally manufactured from 6 inch PVC pipe. Since then, I’ve experimented with several variations on that design, in search of less expensive ways to get started in hydroponics.

Shown here growing several varieties of leafy greens This system is extremely versatile and very popular with commercial growers looking to produce large harvests from small spaces both indoors and out.
PVC pipe’s inherent ease of use during construction, versatility, and availability as a plumbing product make it an ideal material for building your own hydroponic system. Standard round PVC pipe is available from any plumbing supply store, and the newer square extrusions used here are available from construction material and outdoor fencing suppliers.
The 5 inch square extrusions have the added benefit of increased stiffness, their flat bottoms prevent them from rolling over and they require less support than their 4 and 6 inch tubular counterparts. Before you get carried away trying to decide which type of PVC pipe to use for your system, remember that plants only care about food, water and proper oxygenation, and all of these designs do a good job of providing each of these requirements.
 We recommend Rough tote storage containers for nutrient reservoirs since they are made from FDA-approved resins suitable for long-term contact with food. Their green and blue coloring keep algae growth to a minimum and they are virtually indestructible.
Parts List
(1) 31 gallon Rough tote reservoir or similar
(4) 6 ft. PVC pipes (use either 4? or 6? round or 5? square type — the latter is used here)
(8) End caps (use rubber “Gem” caps on round pipe, PVC fence caps on square pipe)
(2) Sawhorse kits and whatever materials are required to assemble them
 4″ round, 6″ round (both shown with rubber Gem caps installed), 6′, 4.5′ and 3′ chambers made from 5″ square PVC (end caps not shown on square chambers). The number and placing of plant sites is entirely up to the grower, making this design very versatile.
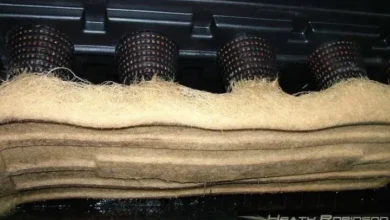
NOTE: Whether you choose 4? or 6? round PVC pipe or the new 5? square extrusions for grow chambers, the principle is the same. Plants are suspended in baskets while the upper part of their roots are treated to a fine spray as the bottom extremities are bathed in a constant flow of oxygen-rich nutrient solution.
(1) 700GPH submersible pump
Approx. 5′ of 3/4? PVC pipe for manifold construction
Approx. 2′ of 1/2? PVC pipe for cutting into spray line support clips
25 feet of .375 ID poly spray line tubing
(4) 3/4? female garden hose swivel to compression adapters (for spray line ends)
(4) 10mm insert plugs to seal spray line ends

(4) 1? ID rubber grommets to seal spray line entry points into growth chambers
(4) 1 1/4? drain fittings (bulkhead fittings) or 1 1/4? drain pipe grommets (if grommets are used you will also need (4) 6′ lengths of 1 1/4? PVC pipes for the level tubes)
(2) 3/4? PVC “L” fittings
(4) 3/4? PVC “T” fittings

(1) 3/4? female garden hose to 3/4? barbed fitting
4 ft. of 3/4? ID opaque tubing (poly or vinyl, aquarium/drinking water safe)
(6) 3/4? slip to male hose thread (MHT) to adapter
(1) 3/4? MHT cap
(1) small can PVC cement
(1) tube of aquarium-safe silicon sealant
(2) 1? hose clamps
(1) 1/2? ID rubber grommet for sealing level tube exit
(1) 1/2? barbed elbow fitting for level tube assembly
(1) 1/2? ratchet clamp for securing level tube on elbow fitting
24? of 1/2? blue or green poly tubing for level tube
(1) 3/4? high volume filter for keeping spray lines clear
(1) 4 quart LECA stone 9-16mm (fills twenty 3? cups)
Desired amount of 3? net cups: one for each plant site

The versatility of PVC pipes when used as growing chambers creates endless possibilities. Here is a 3′ model that provided Keith with fresh salad greens all winter long and kept the air in his home office comfortably humidified and fresh too!
Tools You’ll Need
Electric or battery powered drill, 3/8? or 1/2? chuck
1 7/8?, 2 7/8?, and 4? hole saws for cutting drain holes, plant sites and service ports
5/8?, 3/4?, and 7/8? speed bore bits (flat, inexpensive drill bits)
1/8? drill bit to make spray holes in spray lines
Hacksaw for cutting PVC pipe
Razor knife for cutting poly tubing
Ruler and a marker
Using either the template provided below or your own design, you must first layout each of the holes to be cut.

It’s best to mark and measure them center to center. Make sure to pay close attention to avoid any mistakes which can be very costly in both time and materials.

Use the 2 7/8? hole saw and a cordless drill to cut each of the grow sites and a 4? hole saw for the access ports (one per chamber, on the right side of the chambers shown here). The 14v cordless drill I used here has cut hundreds of holes over the last year! A single charge was enough to finish the chambers shown here, each with 6 grow sites and 1 access port.

The 5? and 6? growth chambers each have an internal spray line that needs to be suspended from the top of the chamber. To do this, cut spray line clips from the 1/2? PVC pipe (3/4? to 1? long works best).

Use 3-5 spray line clips per chamber and glue them into the chambers using PVC cement. For best results, use PVC primer before applying glue to soften the material and create a tighter seal. Glue them exactly between the grow sites so as not to block the spray holes placed just off to the side of each grow site.

 The black arrow denotes how the spray line passes through each of the clips.
Using a 1 3/8? hole saw, cut a hole into each of the end caps to accommodate the spray lines. Center this hole exactly 1 1/8? down and 1 1/8? over from the same corner the spray line clips are attached. You will use a 1? ID rubber grommet (shown in step 9) to seal the compression fitting as it passes through this hole.

End caps for the 5? PVC chambers need to be glued on using PVC cement. Use PVC primer first on both surfaces to be glued.

Stand the chambers on end and use a small squirt bottle to fill any gaps between the cap and chamber to prevent leaks.

Assemble your stand from two sawhorse kits and some 2×4 lumber. Use a level placed between the two sawhorses to make sure the chambers will lay flat, with zero slope.


 Place the level across each sawhorse to make sure all the chambers will be at the same height.
Assemble your system so that each chamber is evenly spaced apart on the sawhorse supports. It is best to leave yourself a few inches of space between the bottom of the chambers and the lid of your reservoir. Measure the spacing from the center of one chamber to the center of the next to determine the spacing of spray lines on the manifold below.

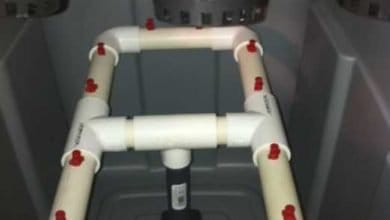
Lay out the manifold parts as shown here and measure out the lengths of 3/4? PVC pipe you will need to complete the manifold. You may wish to refer to the next section for more photos of the complete manifold and how it attaches to the system for further clarification.


Assemble the internal spray lines from the parts shown here: 3/4? FGH swivel adapter with a compression end, .375 ID poly spray line, 10mm insert plug, and a 1? rubber grommet to seal the entry point of the spray line into the growth chamber. Begin by cutting the poly spray lines down to the exact inside length of your chambers.

You will then need to use a 1/8? drill to puncture spray holes into each line just off to each side of every grow site. Keep the holes about a half inch from the grow sites so they don’t get blocked by the spray clips installed in the previous steps.

 NOTE: once you insert the spray lines into the compression end of the adapters, they are nearly impossible to remove with damage. Test fit everything first! You only need to insert about 1/2″ into the compression end for a good seal.
Using a 1.5? hole saw, cut a hole for each chamber’s drain fitting to mate with the lid of your reservoir. I have found the simplest way to measure and mark off the location for these holes is to connect all chambers to the injection manifold, position them over the reservoir, and mark the center of each drain hole by sighting down each drain fitting.


Connect your submersible pump as shown here using a length of vinyl tubing and a nylon barb to female hose thread adapter.

A 7/8? hole in the bottom of the reservoir wall accepts a 1/2? ID rubber grommet, 1/2? barbed elbow and 1/2? level tubing to complete your nutrient reservoir level indicator.

 1/2″ level tubing is blue in this example.
 NOTE: there are actually two options available when making the drain stems. The first is to use the bulkhead fitting and nut. The second is to use a rubber grommet and 1 1/4″ PVC stub. Cost and availability of the materials will help you decide, as I’ve found both to work equally well.
If you choose to use the bulkhead fitting, be sure to seal with aquarium-safe silicone sealant to prevent leaks. Apply as shown here.

If you choose to go with the grommet method, it helps to apply a thin coating of non-toxic silicone grease to the inside of the grommet to allow the level tube to move up and down easily.

You are now ready to connect the chambers to the injection manifold as shown in the sequence of photos here.


Since this system is a pure water system, the only growing medium you will require is that to start your seeds or cuttings. Once you have viable plants, they will be placed into 3? plastic net cups with a handful of LECA stones to give the roots something to hold onto and keep them from falling over inside the cups.
Start your seeds or cuttings in your preference of starter cubes or sponges. Transplant to net cups once roots are clearly visible from the bottom of the cubes. Set plants in cups into your system: make sure the initial water level touches the bottom of the cups, as shown here.

Depending on your crop and stage of growth, you will want to choose a good quality hydroponic nutrient. Do not use fertilizers designed for soil gardening, as they do not contain a complete balance of nutrients required for growing in water. While you can successfully grow more than one type of plant in this system (e.g. vegetative, reproductive), for best results choose one or the other. This way you can target your nutrient solution to best satisfy its requirements.
Drain and replace nutrient in the reservoir when it falls to a level just above the top of your pump. Never let your pump run dry! Inspect and clean in-line filters with every nutrient change. It’s also a good idea to clean the chambers and reservoir between crops to remove any sediment or algae that can sometimes build up in high light conditions. Use a scrub brush and a 10% bleach solution. Rinse thoroughly!
Drain your reservoir and use the waste water to feed your landscaping or lawn. If using LECA stones or gravel, dump into a storage container and rinse thoroughly, then allow to dry. Clean all empty bucket cups and chambers with hot water and allow to dry before storing.

Hello Vince sorry for the late reply.
Peppers tend to grow very large when grown hydroponically, I think you would do better if you planted them alternately so the spacing would be approx 13 inches between plants. I hope this reply hasnt come too late for you.
good luck
H
hello Vince,
1, The Oxygen is maintained because the spray lines are running continually, this means the nutrient solution in the grow tubes is constantly refreshed from the reservoir and the spray action additionally oxygenates the nutrient solution in the tubes.
2, You can use sprinklers, I prefer a 90 or 180 degree spray heads like these placed between the plant sites. Position the spray so it doesn’t directly spray on the plant roots as this can damage the roots.
3, I havent had any problems with water spraying outside of the baskets, you can sometimes have this problem with small net pots but not with the larger ones. Once the plant roots have established themselves it should become lees of a problem for you.
4, 4″ will be fine this system can grow some really large plants. I myself grow peppers and haven’t had any problems with the roots getting anyway near to filling the 5″ system so I am sure you will be ok.
good luck
H
Thanks a lot for your answers!
Quick additional question (before I start doing and other questions come to my mind ☺️): for your larger plants (peppers), how much space did you leave between 2 baskets? Did you leave 6.5″ as above or more?
Thanks, and thanks again for this fantastic diy walk through…
Thanks a lot for this detailed explanation. I am going to build a similar system, and wanted to ask a few questions :
1. How do you manage to get oxygen in the water at the bottom (“bottom extremities are bathed in a constant flow of oxygen-rich nutrient solution”)? Is it through the holes made in the spray lines?
2. How do you create the “fine spray”? Is it only achieved by punching tiny holes in the spray lines or are you using sprinklers?
3. How can you manage to have no water sprayed outside of the chamber through the basket? In my current system, some of the fine most goes out through the baskets and the “growing” media (clay pellets)
4. I only found 4″ square pvc pipes (not the 5″). Will there be enough space for the roots of my plants (mostly tomatoes, zucchini, cucumber, pepper)
Thanks a lot!
I can’t find 5 inch PVC Square pipe anywhere in the UK, any suggestion please?
Can you give me a rough estimate on the cost of making something like this?
Yes you would run the pump 24/7 for best results : )
nice set up do you run this system 24/7 please let me know thanks
very good liked very much very explaind