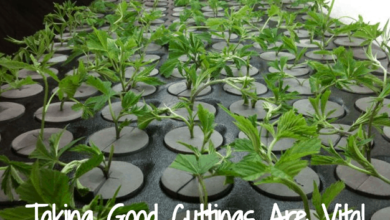
growing weed indoors the easy way
How do I Growing Weed Indoors the Easy Way Growing weed indoors can be a rewarding and enjoyable hobby, but it can also be challenging and frustrating if you don’t know what you’re doing. There are many factors to consider when setting up your indoor grow room, such as lighting, ventilation, temperature, humidity, nutrients, and more. In this article, we will guide you through the basics of growing weed indoors, and show you how to avoid some common mistakes and problems.

Today we explain how YOU can do it, and if you have never ever grown your own weed prior to you will be astonished how simple it is.
There are lots of various approaches to growing cannabis but we will concentrate on one simple and fast way.
Marijuana use is slowly becoming legal and accepted specifically for medical use. The American states of Washington and Colorado legalized pot in 2012 and where the Americans go, the rest of the world normally follows when it concerns drug laws.
So if you have wished to know how to grow an unlimited supply of top-notch cannabis then continue reading. Why pay high costs for marijuana when you can grow much better quality yourself, more-or-less totally free.
Why Grow Weed Indoors?
Benefits of Indoor Cultivation:
- Controlled Environment: Tailor conditions like temperature and humidity for optimal plant growth.
- Year-Round Cultivation: Indoor growing is not limited by seasons or weather conditions.
- Variety and Quality: Experiment with different strains to find your preferred taste and potency.
- Cost-Effective: Save money in the long run by growing your own supply.
- Personal Satisfaction: There’s a unique pleasure in nurturing and harvesting your own plants.
Indoor cultivation offers unparalleled control over the growing environment, allowing you to create ideal conditions for your plants. This can lead to higher yields and better quality cannabis compared to outdoor growing. Additionally, growing your own supply can be more cost-effective and rewarding, giving you a sense of accomplishment while ensuring you know exactly what you’re consuming.
The First Step to Growing Weed Indoors, step 1,
Choosing Your Space:
- Grow Tent: Ideal for beginners, grow tents are easy to set up and offer a controlled environment. Look for one at least 1.5 meters tall, with reflective interior lining.
- Alternative Spaces: Small closets or custom-built grow cabinets can also be effective if you’re on a budget.
Lighting Essentials:
- Types of Lights: Choose between High-Pressure Sodium (HPS) or Metal Halide (MH) lamps. A 250W HPS or 400W HPS light is a good starting point.
- Placement: Ensure the light is close enough to the plants without causing heat damage.
Light Comparison Chart:
| Light Type | Intensity | Heat Output | Energy Efficiency |
|---|---|---|---|
| 250W HPS | Medium | High | Low |
| 400W HPS | High | Very High | Moderate |
| MH | High | High | Moderate |
By selecting the right space and lighting, you set a strong foundation for your indoor grow. A grow tent simplifies the process, providing an ideal environment for beginners. When it comes to lighting, balancing intensity and heat output is crucial for healthy plant growth.
Get an area to grow in, the simplest method is to purchase a little grow-tent online. It should be around 1.5 m tall or more if possible, and maybe a meter broad and a meter deep.

You can grow cannabis indoors in areas smaller sized than that. One of the most practical ways to get started is to purchase a grow tent. Companies like Hydrolab, Secret Jardin, Roof Qube and so on.
There are many camping tent manufacturers that will offer a starter tent for around $100 or less. The beauty of the camping tent is that it is the easiest way to begin, it takes 10 minutes to set up the camping tent.
The inside lining is generally a reflective silver, the outside is usually black, it will have zips to open/close and ready-made openings for electrical cable televisions and so on.
If you can’t afford a tent you will be able to utilize a small closet or maybe you might construct a grow cabinet yourself.
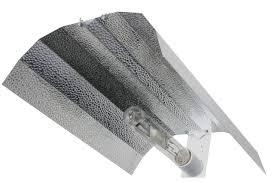
Step 2, Get a light. Marijuana needs intense light to grow. The least expensive lights to start with are 250W sodium (‘HPS’) or 400W HPS lights. But LED Grow lights have overtaken HPS in terms of reliability and the low running costs.
Benefits of LED Grow Lights:
- Energy Efficiency: LEDs consume less power than HPS and MH lights, making them more cost-effective in the long run.
- Lower Heat Output: LEDs emit significantly less heat, reducing the risk of plant burn and the need for extensive cooling systems.
- Longevity: LED lights have a longer lifespan, often lasting for several years before needing replacement.
- Full Spectrum: Many LED grow lights offer a full spectrum of light, which is beneficial for all stages of plant growth.
- Adjustable Spectrum: Some advanced LED models allow you to adjust the light spectrum, giving you the flexibility to tailor the light to different growth stages.
Updated Light Comparison Chart:
| Light Type | Intensity | Heat Output | Energy Efficiency | Lifespan | Spectrum |
|---|---|---|---|---|---|
| 250W HPS | Medium | High | Low | Short | Limited |
| 400W HPS | High | Very High | Moderate | Moderate | Limited |
| MH | High | High | Moderate | Moderate | Limited |
| LED | Adjustable | Low | High | Long | Full/Adjustable |
With the addition of LED grow lights, you have a comprehensive view of your lighting options. LEDs are a great choice for growers looking to minimize heat and energy consumption while maximizing control over the light spectrum.
The lights can be purchased from any grow-shop in your local city, or online. The light is linked to mains electricity through a ‘Ballast’ which controls the electrical supply. You will likewise require an electrical timer to switch over the light on and off instantly, you will be able to buy this at the exact same time as your light.
Light Intensity and Plant Growth:
- Plants grow in response to the hormone gibberellin, which is influenced by light intensity.
- Insufficient light leads to stretched, weak plants. Aim for intense, appropriate-spectrum lighting.
Temperature Control:
- Daytime Temperature: Ideal is between 21°C and 25°C. Higher temperatures lead to longer internodes.
- Nighttime Temperature: Should not fall below 21°C to avoid stretched growth.
- Temperature Chart:
Day Temp (°C) Night Temp (°C) Plant Growth Effect 21-25 >21 Optimal Growth >25 Significantly <21 Stretched Internodes
Plants grow and stretch because of the plant hormone gibberellin. This also causes greater, more nimble and faster cell growth between the nodules when the plants are exposed to inappropriate and insufficient light. To avoid this, you need to see that you always use sufficiently intense plant lighting with the right spectrum. See more at The Right Light for Cannabis Plants . The light should be as close to the tops of the plant as possible without burning it.
With sodium vapor lamps, a certain distance should be maintained between plant tips and the light, because they are very hot and otherwise burns may occur in the plants. At the same time, a sufficiently strong fan must be used at the same time because otherwise overheating may occur at the tops of the plants and in the box in general. In any case, it is important not to raise this minimum distance (not at all), because this would also lead to a stretched plant growth and small buds. One should see that all plants are well under the light so that no one has to make long and stretch to get to the light.
Control of the temperature
The growth activity of many plants including the marijuana plant is influenced and influenced by temperature and temperature differences. The internode distances of cannabis plants can be significantly influenced by temperature control. The internode length is directly related to the difference between daytime and nighttime temperatures.
The warmer it is during the day in the grow box compared to the night temperature, the larger the internode length will be ( day = when the lamp is on). The reverse is also true. The more the day and night temperatures lie together, the shorter will be the internode intervals. This means that if the temperature drops too high in your grow box at night (lamp off), this can be a problem and plants sprout up.
The ideal indoor grow temperature during the day when the lamp is on is between 21 ° and 25 ° C (best is 24 ° C). This temperature should neither be exceeded nor exceeded. At night, the temperature should then not fall below 21 ° C in order to avoid too large internode distances.
When the light cycle is brought to 12/12, the night temperature is initially raised to the same temperature as the daytime temperature, but not above 25 ° C. Room heaters, grow box heaters and thermostats are used to maintain the night temperature at the desired level Use especially in winter. In warm countries, in the summer most of the indoor grow air conditioning and cooling units must be used to keep the temperature at the desired level and avoid overheating.
Step 3,
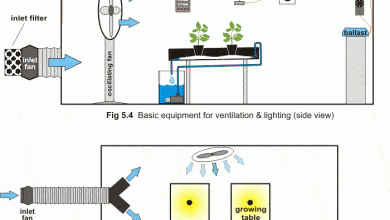
Air Circulation:
- Use oscillating fans to simulate natural wind, preventing stretching and promoting strong cell walls.
- Ensures even distribution of CO2 and oxygen, essential for rapid plant growth.
Proper light intensity and temperature control are pivotal for healthy plant development. Striking the right balance in these factors can significantly enhance the quality and quantity of your yield. Additionally, good air circulation plays a vital role in strengthening your plants and providing them with necessary gases for photosynthesis.

Get an extraction fan, carbon filter and some ducting online or from your local grow shop. Cannabis plants require a supply of fresh air to grow well. The extraction fan will suck the air out of your outdoor tents through the carbon filter. Due to the fact that it removes the strong cannabis odor, the carbon filter is extremely important. The waste air is usually vented outside with the pliable tubes which came with the fan.
Air movement

Oscillating fans in the plant space simulate the wind as it occurs in the wild and moves leaves and stems. At the same time, this movement helps to prevent stretching, as the plants are busy strengthening and repairing the walls of the cell and are therefore less stretched. In addition, oscillating fans ensure that CO2 and oxygen is available to the fast-growing plant.
Step 4 Grow Medium.
Selecting the Right Soil and Pots:
- Soil Types: Choose light soil with good drainage, ideally with about 30% perlite.
- Pot Size: 7-10 liters is optimal for root development and plant growth.
Recommended Soil Types:
- Pre-mixed soils from brands like Canna and Biobizz offer convenience and quality.
- Look for soils specifically designed for cannabis cultivation.
Nutrient Management:
- Start with a simple ‘Bloom’ nutrient additive.
- Follow the recommended dosage on the nutrient bottle.
- Gradually introduce nutrients as the plant grows, avoiding overfeeding.
Nutrient-rich soil is the foundation of a healthy cannabis plant. The right soil and pot size can significantly impact the plant’s growth and yield. When it comes to nutrients, less is often more. Overfeeding can harm your plants, so it’s important to start slow and adjust based on the plant’s response.
Buy some plant pots and soil. The soil should be light and contain possibly 30% perlite which will help keep the soil light. The most convenient method to begin is to order some pre-prepared bags of quality dirt from your local grow shop, these are purpose created soils and will keep life simple for you.
First-time growers commonly purchase pre-mixed dirt to keep life as simple as possible on the first grow. Providers include companies such as Canna, Biobizz and so on. Cannabis can be grown in other methods, with coco fiber and hydroponics. But starting in the dirt is great to begin. Your pot size ought to be around 7-10 liters. Larger pot sizes enable better root development and larger plants.
Pot size
If cannabis roots do not have too much space in the plant pot to expand their roots, the plants will also stay smaller. Basically, smaller pots provide for smaller plants.
Therefore, it is a good way to control the height of the plants rather to use smaller pots, especially if the space for the grow is very limited. In automatic strains, ie auto-flowering cannabis strains you should ignore small pots. In these varieties, a restriction of the root because of small pots leads to significantly lower yields.
Choosing a Suitable Cannabis Strain: Step 5
Recommended Strains for Beginners:
- Look for strains known for their resilience and ease of growth.
- Auto-flowering varieties like “Northern Lights Auto” or “Blueberry Auto” are great options.
Selecting the right strain is critical for a successful indoor grow. The strain determines not just the effects and flavors but also how the plant will grow. Beginners may benefit from choosing auto-flowering or Indica-dominant strains, which are generally more forgiving and better suited to limited spaces.

check out the top rated seed banks on Best Seed Bank HERE or from your local head shop.
- Indica vs. Sativa vs. Hybrid: Consider growth patterns; Indicas tend to be bushier and shorter, suitable for indoor setups.
- Auto-Flowering Strains: Ideal for beginners; they require less maintenance and have a quicker growth cycle.
Key Stages of the Indoor Growth Cycle:
- Germination: Seeds sprout under light soil; keep moist.
- Vegetative Phase: Focus on strong growth; regular watering and light are key.
- Flowering Phase: Triggered by changing the light cycle; this is when buds form.
Growth Cycle Chart:
| Stage | Duration | Key Actions |
|---|---|---|
| Germination | 1-2 weeks | Keep moist, warm |
| Vegetative | 3-8 weeks | Regular watering, 18/6 light schedule |
| Flowering | 8-11 weeks | 12/12 light schedule, monitor buds |
Key Stages of the Indoor Growth Cycle:
- Germination: Seeds sprout under light soil; keep moist.
- Vegetative Phase: Focus on strong growth; regular watering and light are key.
- Flowering Phase: Triggered by changing the light cycle; this is when buds form.
During the vegetative stage, your plants will require plenty of water and a light schedule of about 18 hours on and 6 hours off. As you transition to the flowering stage, adjust the light schedule to 12 hours on and 12 hours off to encourage bud development. Monitoring your plants closely during these stages is essential for optimal growth and timely harvest.
The cannabis strain that you choose for your indoor growing has a huge impact as your plants grow later. The growth pattern and height growth of a plant is mainly determined by genetics. Therefore, it is advisable to choose for the Indoor cultivation rather small, bushy growing varieties, which are particularly suitable for growing indoors.
Seeds ought to be grown under 5-10mm of earth and the surface kept moist till they germinate. Some raisers make use of transparent kitchen foil to seal the plant pots and retain hydration.
When the seeds germinate and the seedling arises, the transparent foil can be gotten rid of. The light can be kept a meter above the seedlings at first, closer later. You might want to begin by growing maybe 4 plants. Each plant might ultimately yield 30-60g of dry marijuana, possibly more.
Maximizing Yield with Training:
- Topping and Fimming: Encourages bushier growth and more colas (flowering sites).
- Low-Stress Training (LST): Involves gently bending and tying down branches to control plant shape.
Step-by-Step Guide:
- Topping: When the plant has 3-5 nodes, cut the top to create two new main stems.
- Fimming: Similar to topping, but only remove 3/4 of the new shoot.
- LST: Use soft ties to bend and secure branches, encouraging horizontal growth.
Illustrative Diagram:
- A visual representation of topping, fimming, and LST techniques.
Benefits of Each Technique:
- Topping: Produces a bushier plant with more buds.
- Fimming: Creates a wider, more spread-out canopy.
- LST: Ideal for managing height and improving light exposure to lower branches.
Training your cannabis plants can significantly impact their yield and overall health. Techniques like topping, fimming, and LST are invaluable for creating a more controlled and productive grow space. These methods not only improve yield but also make efficient use of your grow space by managing plant size and shape.
Topping Your Marijuana Plants

Topping Your Marijuana Plants The easiest is topping (= cutting off the top shoot tip) done when the plants when they are young and have only 3-5 leaf nodes (leaf pairs).When topping the top newest leaf node is cut off the main trunk. This causes the cannabis plant to form two new main stems and put their energy into them. These two main trunks can easily be tied down and/or spread apart into a V shape. If these two shoots after about 2 weeks later get topped again , you get 4 Colas.
The topping of the cannabis plants later causes a bushier growth and the energy is more evenly distributed throughout the plant. The reason is auxin (plant hormones), which are located in the topmost tip of the main stem and control continuous upward growth. When this (top) tip is cut, the auxin concentration is distributed more to the other branches, which in turn causes bushier, shorter, and squatter growth.
Fimming Cannabis Plants

Fimming is a similar and also effective method to limit plant growth in height and to influence the growth habit. When Fimming or FIM (the word comes from “Fuck I missed”) it’s not the entire shoot over a leaf node which is removed, but only about 3/4 of the newly growing shoot cut. As a result, the crown widens with many branches.
Low-stress training cannabis

Low-stress training methods are low-stress plant training methods to control the growth of cannabis plants and increase yield. The low-stress methods include, but are not limited to, putting down, working with a planting net (SCROG) and super cropping , which does not require cutting off parts of the plant and thus being gentler on the plant.

Super-cropping and also the tying down is done with pliable, soft and fresh shoots, and not the older woody ones that are already older and threaten to break or splinter when bending or kinking. When plants are manipulated in their growth structure with tethering or super-cropping, they become bushier and develop more horizontally rather than vertically.
Bending and other low-stress methods offer very good and versatile ways to maximize the amount of marijuana harvest when there is little vertical space available.
Supercropping: With super-cropping, bendable branches are slightly bent without breaking. At these sites thick nodes are formed, which can provide the buds with more nutrients.
Tying Down Your Cannabis Plants

is a gentle and effective method to control and restrict height growth. All branches that are higher than the rest are tied down and thus a horizontal growth structure is achieved.
This has the advantage that all flowers, similar to the Super-Srogging , are illuminated evenly and thus become pretty big. The plants are thereby stimulated to develop their growth more evenly and they automatically grow less tall.
you can train almost any cannabis strain to bushy growth and keep it small with the appropriate training methods. Pure sativas are not really suitable for indoor cultivation and rather recommend to the professionals, they also have a very long flowering time and are therefore not economical to grow indoors.
However, there are a lot of hybrids that are Sativa dominant and keep a moderate hight.
Indicas generally grow bushy and rather short. They are therefore always a good choice for growing indoors. Also, auto-flowering cannabis strains keep in general a manageable size and are therefore cultivated indoors by many growers.
You have 2 options– either standard selections or AutoFem ranges. For first time growers, we recommend AutoFem seeds. The seeds produce a harvest around 70 days after germination.
The light should be linked to the electricity through a plug-in basic timer. For AutoFem seeds, the timer needs to be set to turn the lights on for 20 hours followed by 4 hours of darkness. AutoFem seeds are maybe the most convenient for the novice, to begin with, they grow under the same lighting hours throughout their life and they are notoriously easy, even for novice growers.

Growing Weed Indoors the Easy Way, Choose the right cannabis strain
In-Depth Look at the Flowering Stage of Cannabis
Flowering Stage of Cannabis: Key Factors and Management
| Factor | Description | Ideal Conditions or Actions |
|---|---|---|
| Light Cycle | Shift to 12/12 to induce flowering. | 12 hours light / 12 hours uninterrupted darkness. |
| Temperature | Important for bud development and resin production. | Day: 20-26°C; Night: 5°C lower than day. |
| Humidity | High humidity can cause bud rot. | Reduce to 40-50%; increase ventilation. |
| Nutrients | Plants need different nutrients for flowering. | Higher phosphorus and potassium; reduce nitrogen. |
| Light Quality | The spectrum affects bud growth. | Red spectrum; use full-spectrum LEDs or HPS lights. |
| Air Circulation | Essential for temperature and humidity control. | Good ventilation; oscillating fans for air movement. |
| Bud Monitoring | Observing bud and trichome development. | Check for bud growth and trichome clarity. |
| Support | As buds grow, branches may need extra support. | Use stakes or ties to support heavy branches. |
| Flushing | Removes excess nutrients before harvest. | Flush with plain water 1-2 weeks before harvesting. |
Initiating the Flowering Stage:
- Light Cycle Change: Shift to a 12/12 light cycle, meaning 12 hours of uninterrupted darkness and 12 hours of light each day. This simulates the shorter days of autumn, signaling the plants to begin flowering.
- Gradual Transition: It’s beneficial to ease into the 12/12 cycle over a few days to reduce plant stress.
Environmental Factors:
- Temperature: Ideal temperatures are between 20-26°C during the day. At night, a slight drop of 5°C is recommended to mimic natural conditions and promote flowering.
- Humidity: Gradually reduce humidity to 40-50%. High humidity during flowering can lead to mold and bud rot, especially as the density of the buds increases.
- Ventilation: Good air circulation is crucial to keep humidity in check and ensure fresh air supply.
Nutrient Requirements:
- Shift in Nutrients: Transition from high nitrogen levels used during vegetative growth to higher phosphorus and potassium levels, which support bud development.
- Monitor Plant Responses: Adjust nutrient levels based on plant appearance and health. Yellowing leaves might indicate a deficiency, while nutrient burn shows as brown, crispy leaf edges.
Lighting for Flowering:
- Spectrum Requirements: Use lights that lean more towards the red spectrum, which encourages bud growth. Full-spectrum LEDs and HPS lights are effective choices.
- Avoid Light Leaks: Ensure complete darkness during the 12-hour night period. Light leaks can disrupt the flowering cycle, leading to issues like hermaphroditism or reduced yields.
Monitoring and Managing the Plants:
- Bud Development: Watch for the formation of buds at the nodes. They will start small and gradually swell.
- Trichome Observation: Use a magnifying glass to check trichomes on the buds. They’ll shift from clear to milky and then to amber, indicating maturity.
- Support Structures: As buds grow, branches may need support to prevent breaking under the weight.
Final Weeks:
- Flush Before Harvest: Stop providing nutrients and flush plants with plain water 1-2 weeks before harvesting to improve taste and quality.
The flowering stage is a delicate and crucial phase in cannabis cultivation. Attention to detail in lighting, environmental control, and nutrient management can significantly influence the quality and quantity of the final yield.
Harvesting Your Cannabis: Step 6,
- Timing: Look for signs of maturity in the buds, such as the darkening of pistils and a milky color in the trichomes.
- Method: Cut the plants, trim away the leaves, and hang them upside down in a dark, ventilated space.
Curing for Quality:
- After drying for about a week, place the buds in glass jars.
- Open the jars daily for a few minutes to allow air exchange.
- Curing can improve the flavor and potency of your cannabis.
The harvesting and curing process is crucial for the final quality of your cannabis. Proper timing of the harvest ensures maximum potency, while curing develops the flavors and aromas, enhancing the overall experience.
You will water the plants and progressively present plant feed into the water as the plants get bigger. The plant-feed bottle will have suggested dosage rates on it. Your hydro store will have a range of plant feeds to suggest.
To begin with simply get a ‘Bloom additive’, keep it nice and simple. Resist the temptation to over-water and over-feed, these are the biggest errors made by many first time cultivators. At first, plants will require watering just once or twice a week and will not require feeding for possibly 3 weeks.
At 70-75 days you will be able to cut the plants down,
How to Grow Weed Indoors The Conclusion
Growing weed indoors can be a fun and rewarding hobby, but it also requires some knowledge, skills, and equipment. By following the steps and tips in this article, you can grow your own weed indoors, and enjoy the fruits of your labor. Remember to always be careful and responsible when growing weed indoors, and respect the laws and regulations in your area. Happy growing!
Glad you liked it Navigator, good luck with your grow
This article is such a great experience to me I’m in South Africa and I’m first time grower